
Skip to content
Product
FeaturesEverything the app does, feature by feature IntegrationsWorks with your gate, security and managing agent PricingFrom R10 per property per month
Who it’s for
Trustees and directorsRun the scheme without the WhatsApp chaos Estate managersOne dashboard for the whole estate Managing agentsWe plug into your system. We don’t replace it. ResidentsGet the app for your estate PartnersFor access control and security providers
Resources
BlogGuides for running a community scheme
Help Contact
Log in
Residents and estate managersLog in to your estate Property managersFor managing agents
  1. Help centre
  2. Guides
  3. What changed in visitor access
Search the help centre
GuideFor residents

What changed in visitor access

Quick Access is now Get Access on the Visitors tab. Choose the visitor type, add who's coming, then share or revoke the code.

Updated 11 November 2026

In short
  • Quick Access is now called Get Access. You'll find it on the Visitors tab.
  • Deliveries need no visitor details. People you know need a name and number, which are saved for next time.
  • The visitor types you see, and whether a code works once or on several days, are set by your community.
  1. The new way to get your visitors in

    Quick Access is now called Get Access, on the Visitors tab. Choose who's coming, and the app asks only for what that visitor needs.
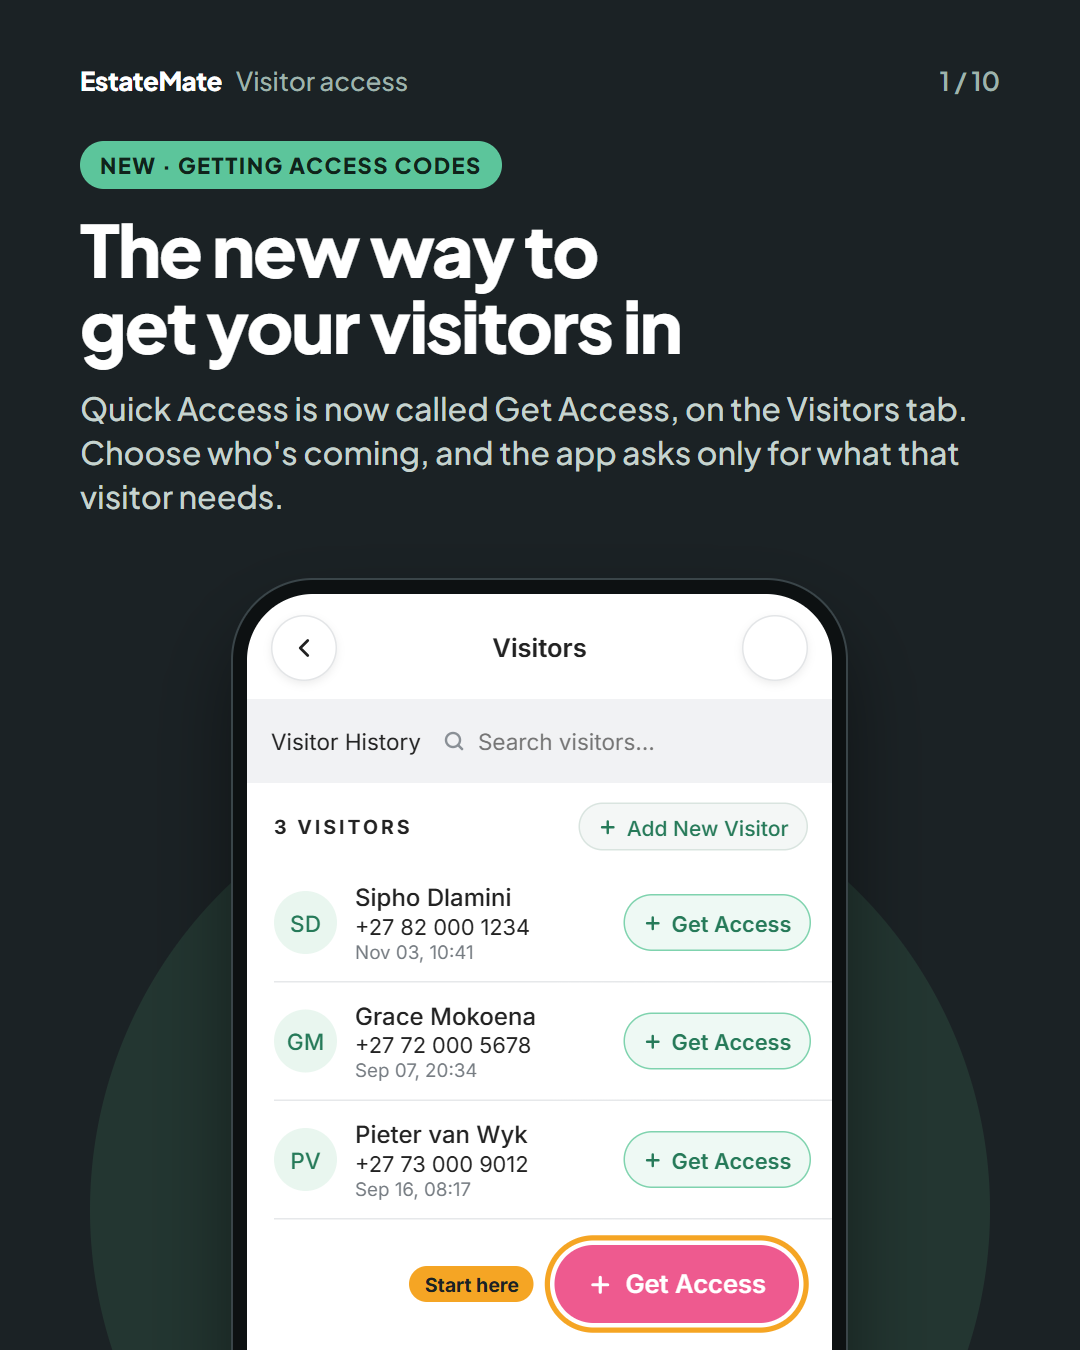
    Cover card. The Visitors screen with a search box and three saved sample visitors (Sipho Dlamini, Grace Mokoena, Pieter van Wyk), each shown with initials and a small Get Access button. The large pink Get Access button at the bottom is circled and labelled "Start here".
  2. Step 1: choose the type of visitor

    The type decides what details you'll need and how the code works. The types you see are set by your community.
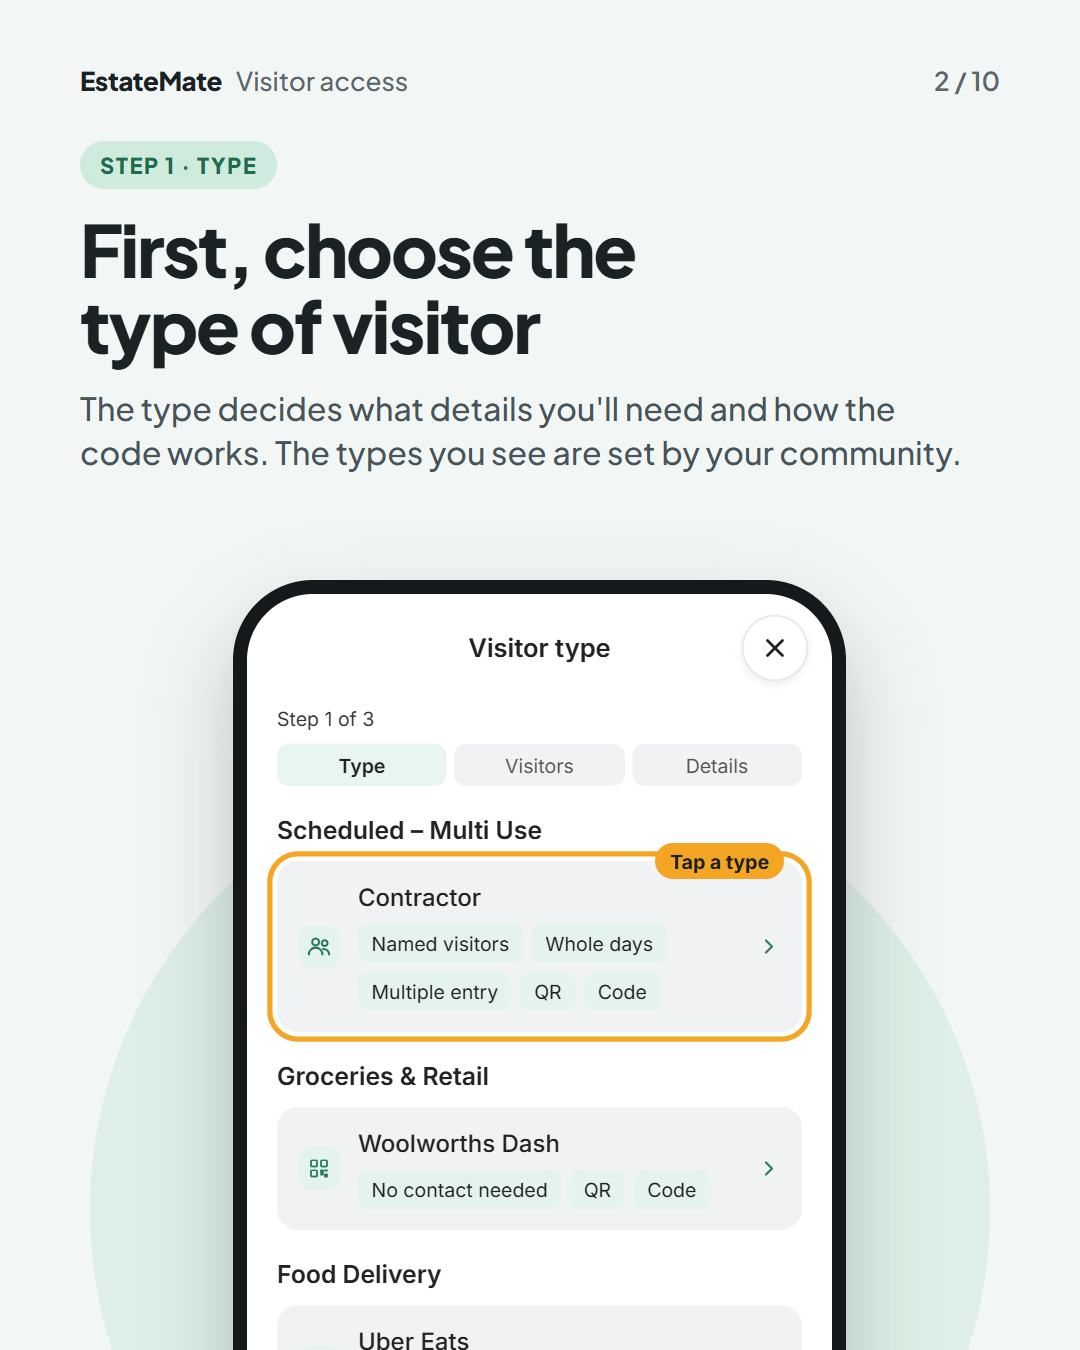
    The Visitor type screen, step 1 of 3 (Type, Visitors, Details). Types are grouped under headings. Under "Scheduled – Multi Use", Contractor is circled and labelled "Tap a type", with the tags Named visitors, Whole days, Multiple entry, QR and Code. Under "Groceries & Retail" is Woolworths Dash and under "Food Delivery" is Uber Eats, both tagged No contact needed, QR and Code.
  3. Good to know: two kinds of visitors, two ways to get a code

    Deliveries and drivers (grocery and food deliveries, like Uber Eats). No name or number needed. The code is ready straight away, the time window is set for you, and you can share it with your driver in a tap.

    People you know (contractors, domestics, family and friends). Add a name and number, saved for next time. You pick the days, today or later. The code works all day on each day, for one entry or many depending on the type.
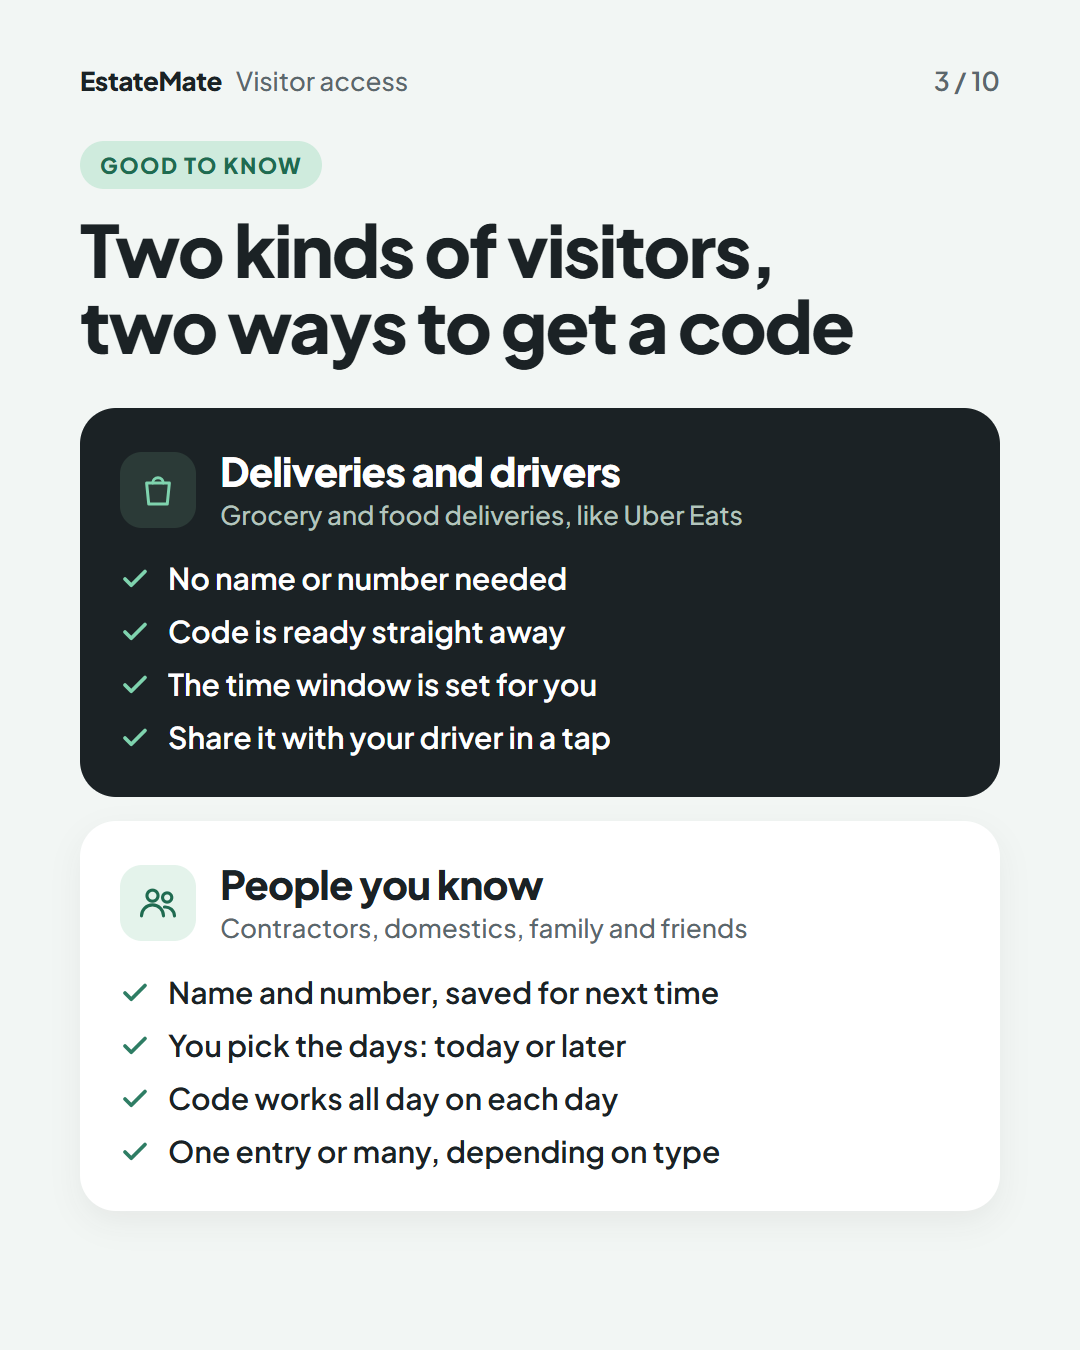
    Two stacked panels. The dark panel, "Deliveries and drivers", has four ticks: no name or number needed, code is ready straight away, the time window is set for you, share it with your driver in a tap. The white panel, "People you know", has four ticks: name and number saved for next time, you pick the days, code works all day on each day, one entry or many depending on type.
  4. Deliveries: no details, just a code

    Pick the service, like Woolworths Dash or Uber Eats, and tap Generate code. Then share the code with your driver.
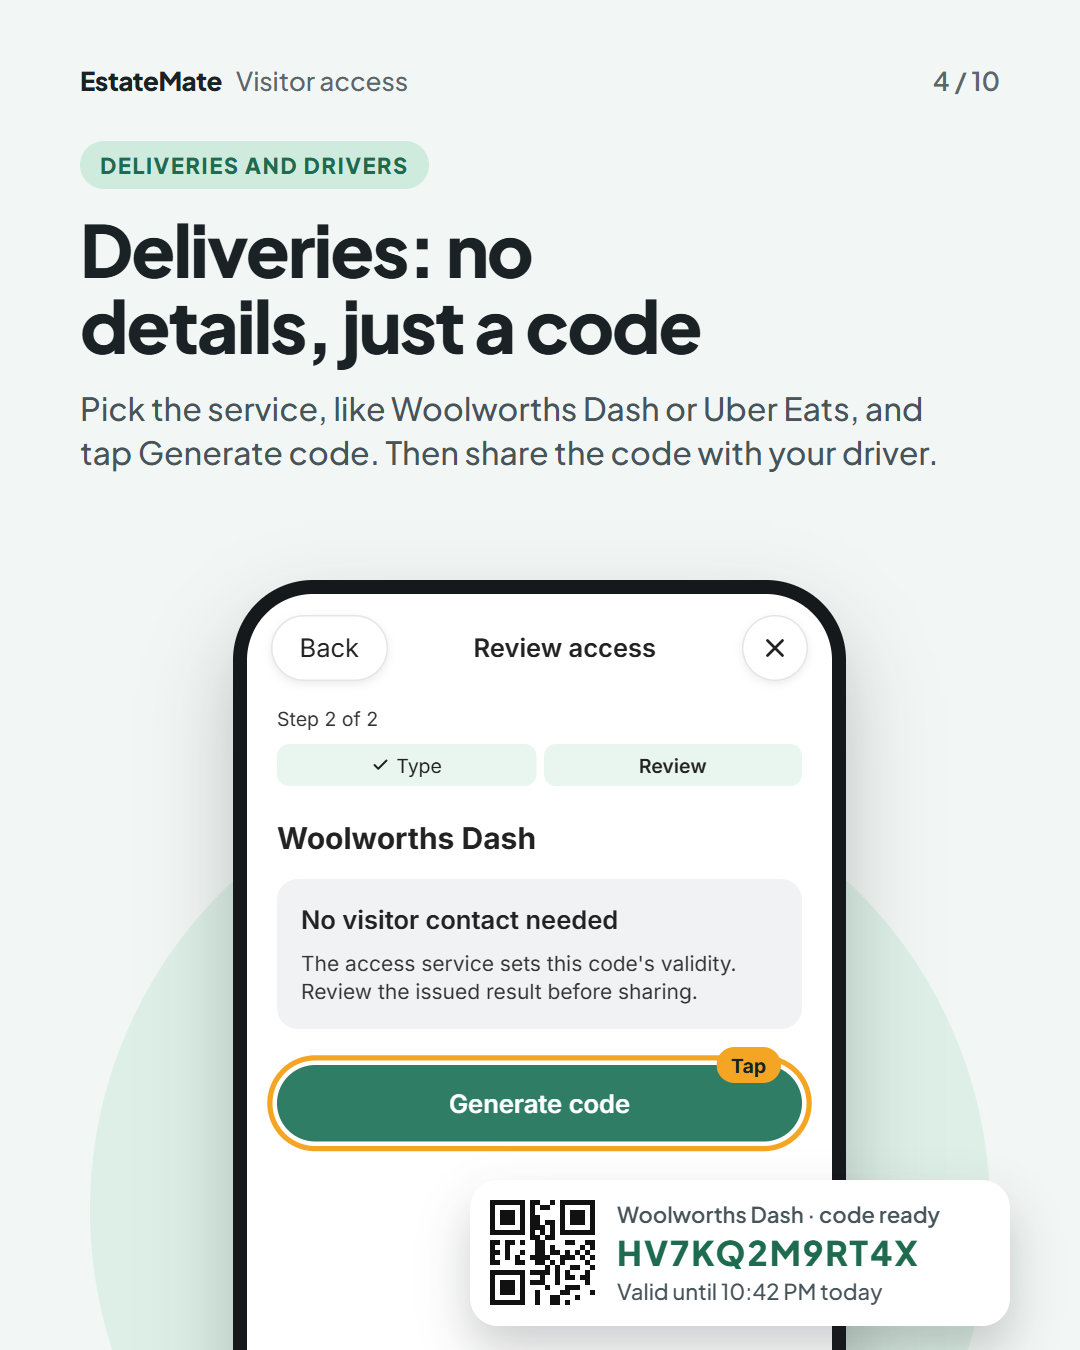
    The Review access screen, step 2 of 2, for Woolworths Dash. A grey box reads "No visitor contact needed" and explains that the access service sets the code's validity. The Generate code button is circled and labelled "Tap". A small result card overlaps the phone with a sample QR code, "Woolworths Dash · code ready", a sample access code and "Valid until 10:42 PM today".
  5. People you know, step 2: pick who's coming, one or many

    Tick visitors you've added before, or tap Add New Visitor. Each person gets their own code.
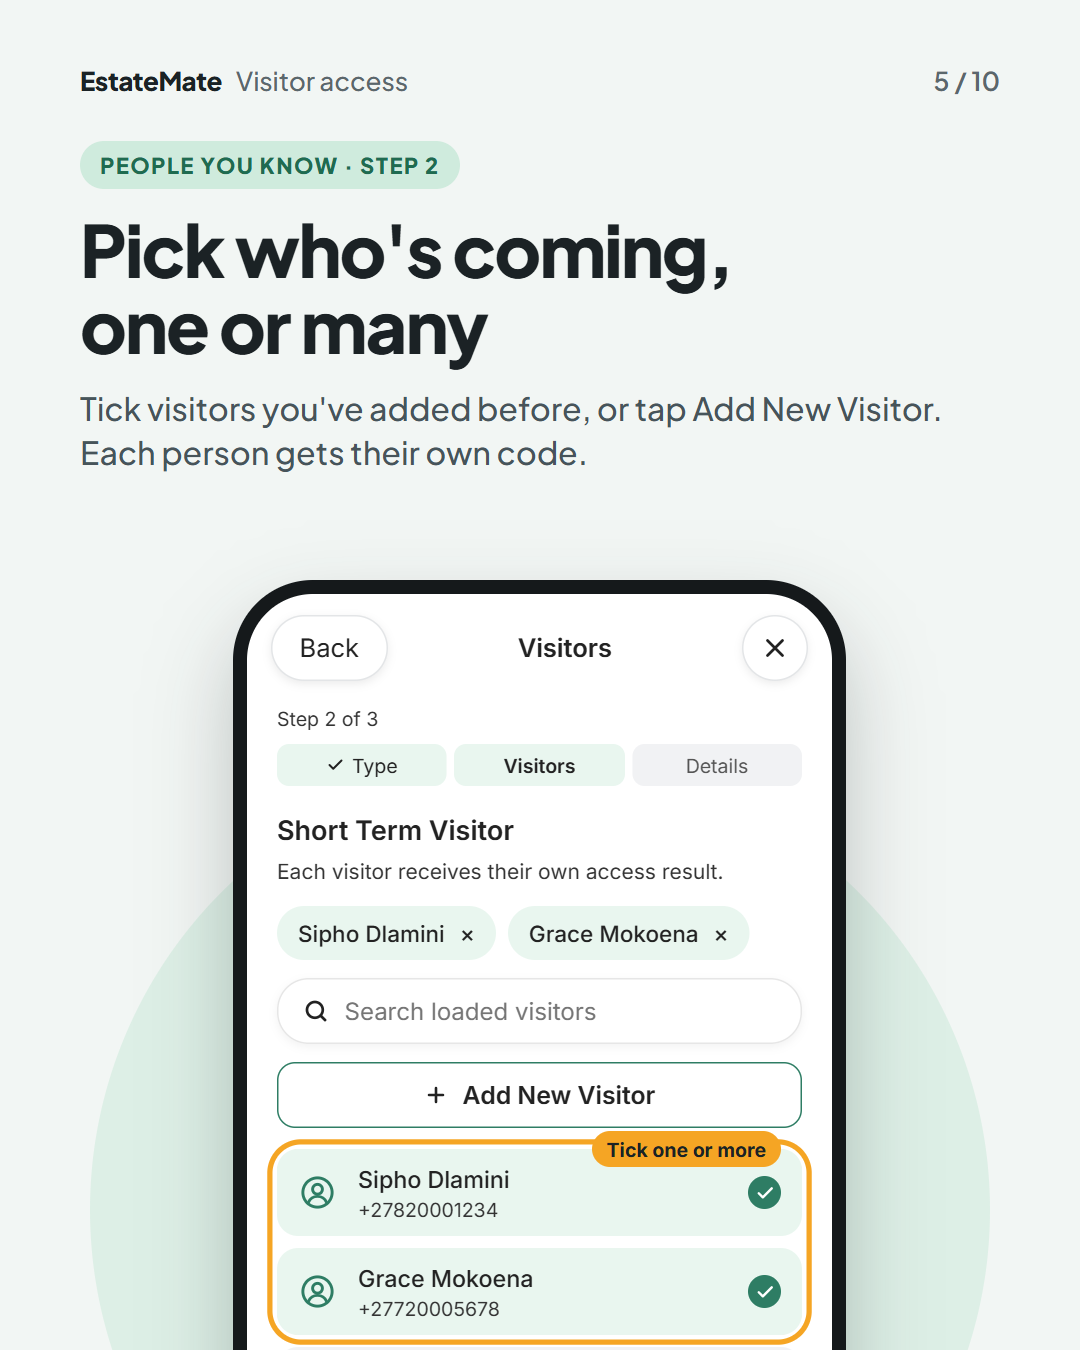
    The Visitors screen, step 2 of 3, for a Short Term Visitor, with the note "Each visitor receives their own access result." Two chosen sample visitors show as chips at the top. Below a search box and the Add New Visitor button, two visitors in the list are ticked, circled and labelled "Tick one or more". A third visitor is not ticked.
  6. People you know, step 3: add the details for each visitor

    1. Each visitor's details. Each type asks for what it needs. Fields marked Saved to contact are remembered next time.
    2. Single or multiple entry. On types that offer both, choose one. Single entry works once. Multiple entry covers several days (see the next card).
    3. Generate code. Tap it once every visitor shows Complete.
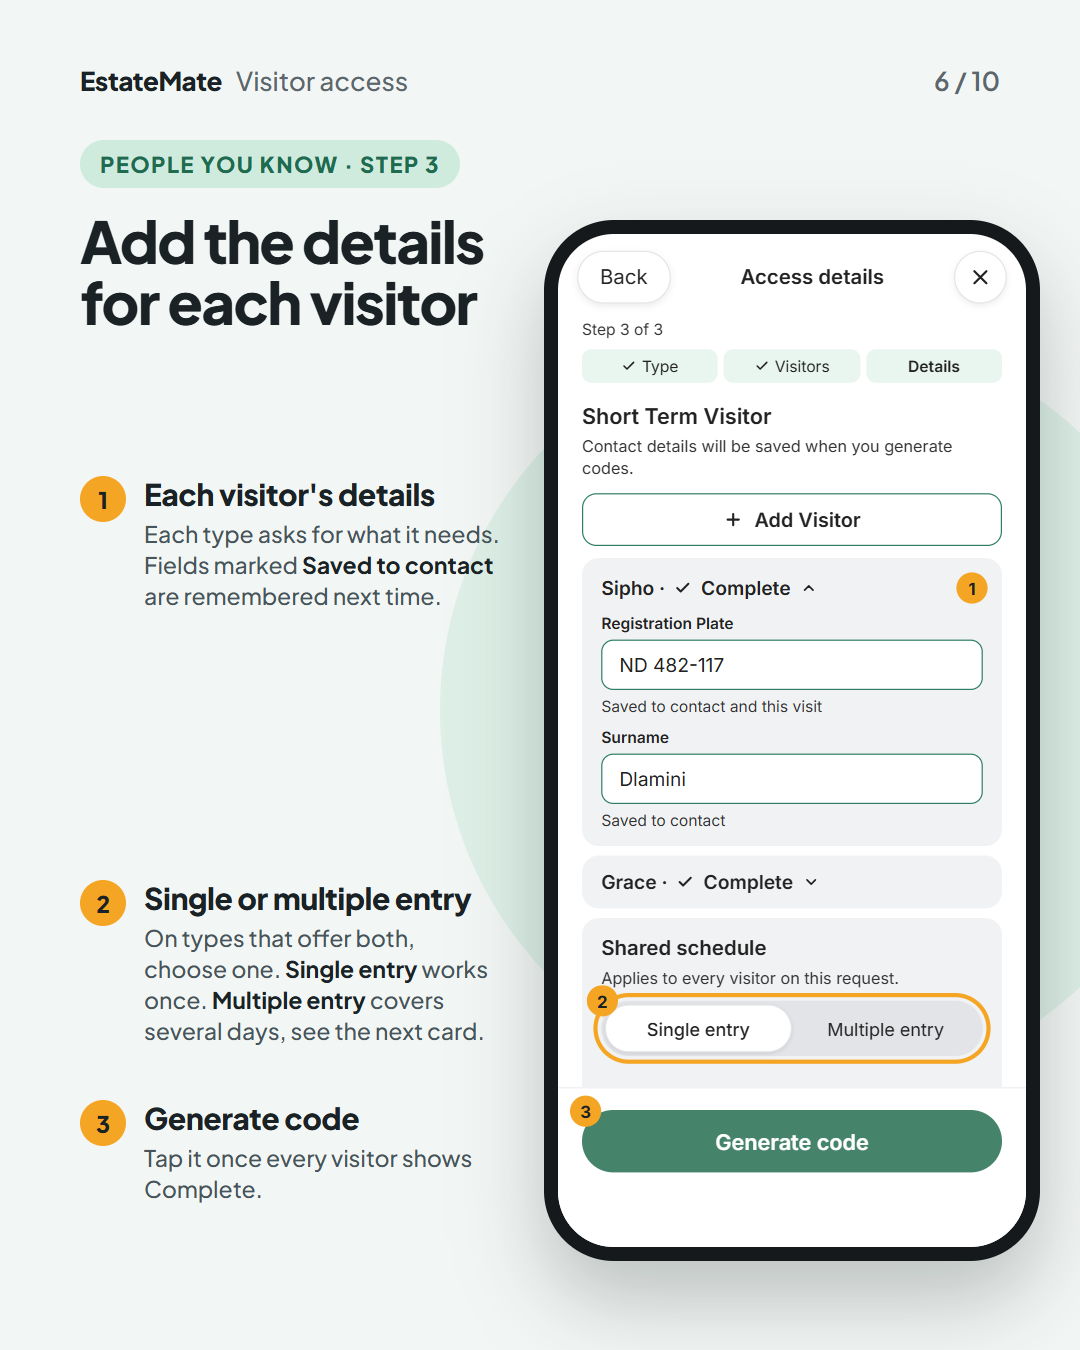
    Three numbered callouts on the left match three amber markers on the whole phone on the right. The Access details screen, step 3 of 3, shows a sample visitor marked Complete with Registration Plate and Surname fields (marker 1), a Shared schedule box with the Single entry and Multiple entry switch circled (marker 2), and the Generate code button (marker 3).
  7. Coming more than once: one code for repeat visits

    1. Pick a type that allows it. Your community decides which types allow it. Look for Single or multiple or Multiple entry on the type.
    2. Choose Multiple entry, then set the days. Pick the first day and the last day. The code works every day in that range, from midnight to 23:59.

    No approval is needed. Your community sets the limits for each type.
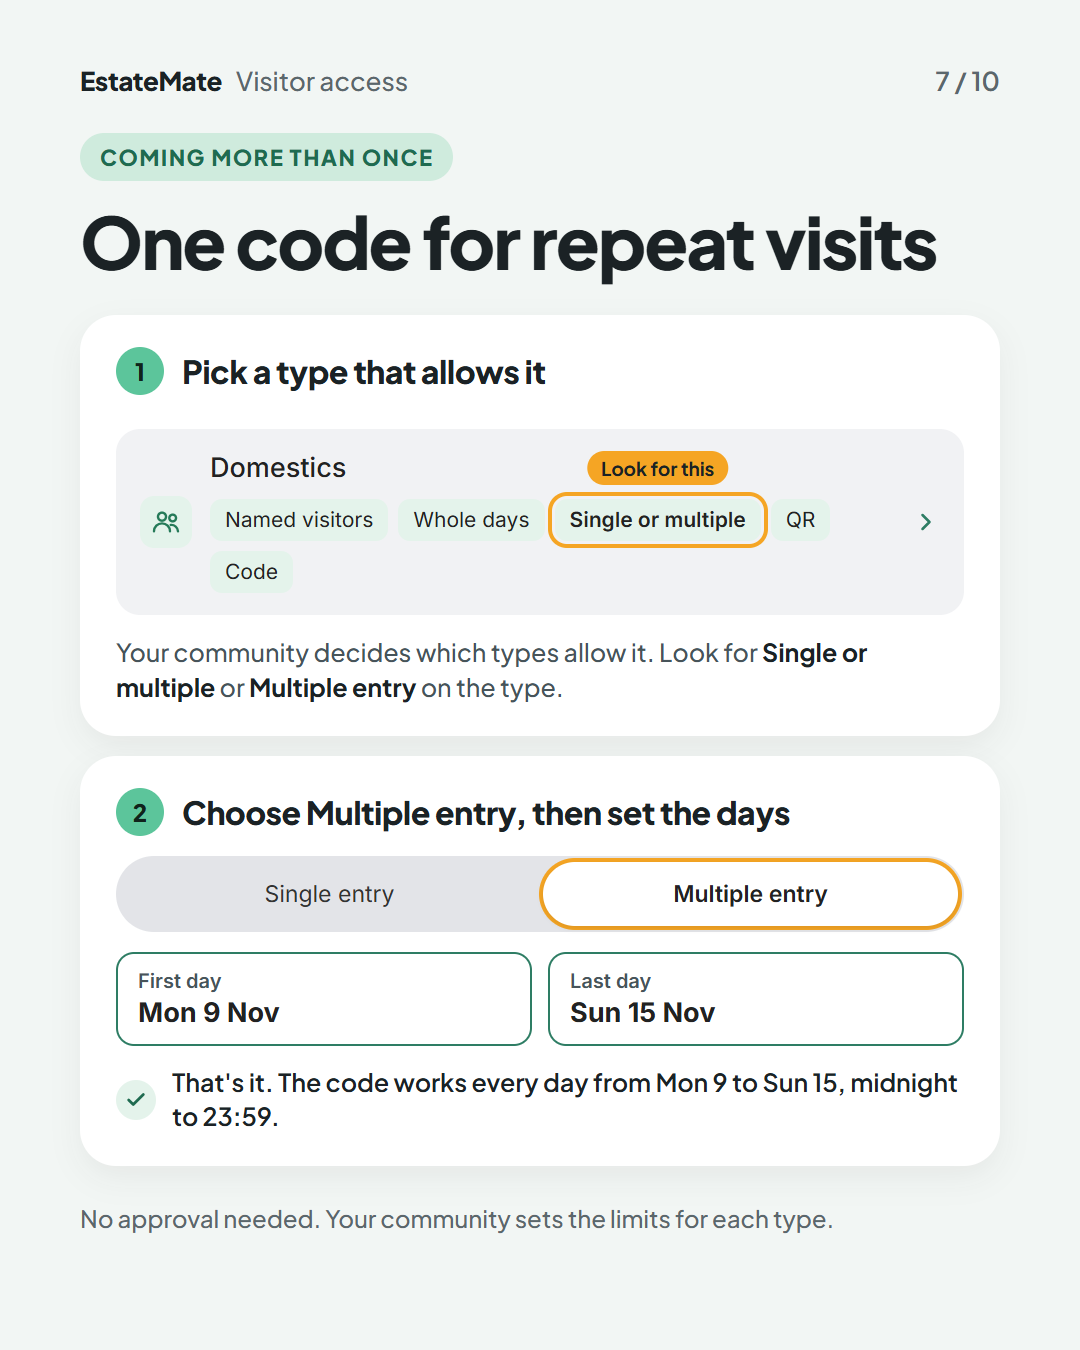
    Two white panels. Panel 1 shows the Domestics type with its tags; "Single or multiple" is circled and labelled "Look for this". Panel 2 shows the entry switch with Multiple entry selected, a First day of Mon 9 Nov and a Last day of Sun 15 Nov, and a tick line: "The code works every day from Mon 9 to Sun 15, midnight to 23:59."
  8. Optional: limit weekdays

    You don't have to. Leave Limit weekdays off and the code works every day in your range. Turn it on to skip days, or to set hours for a day.
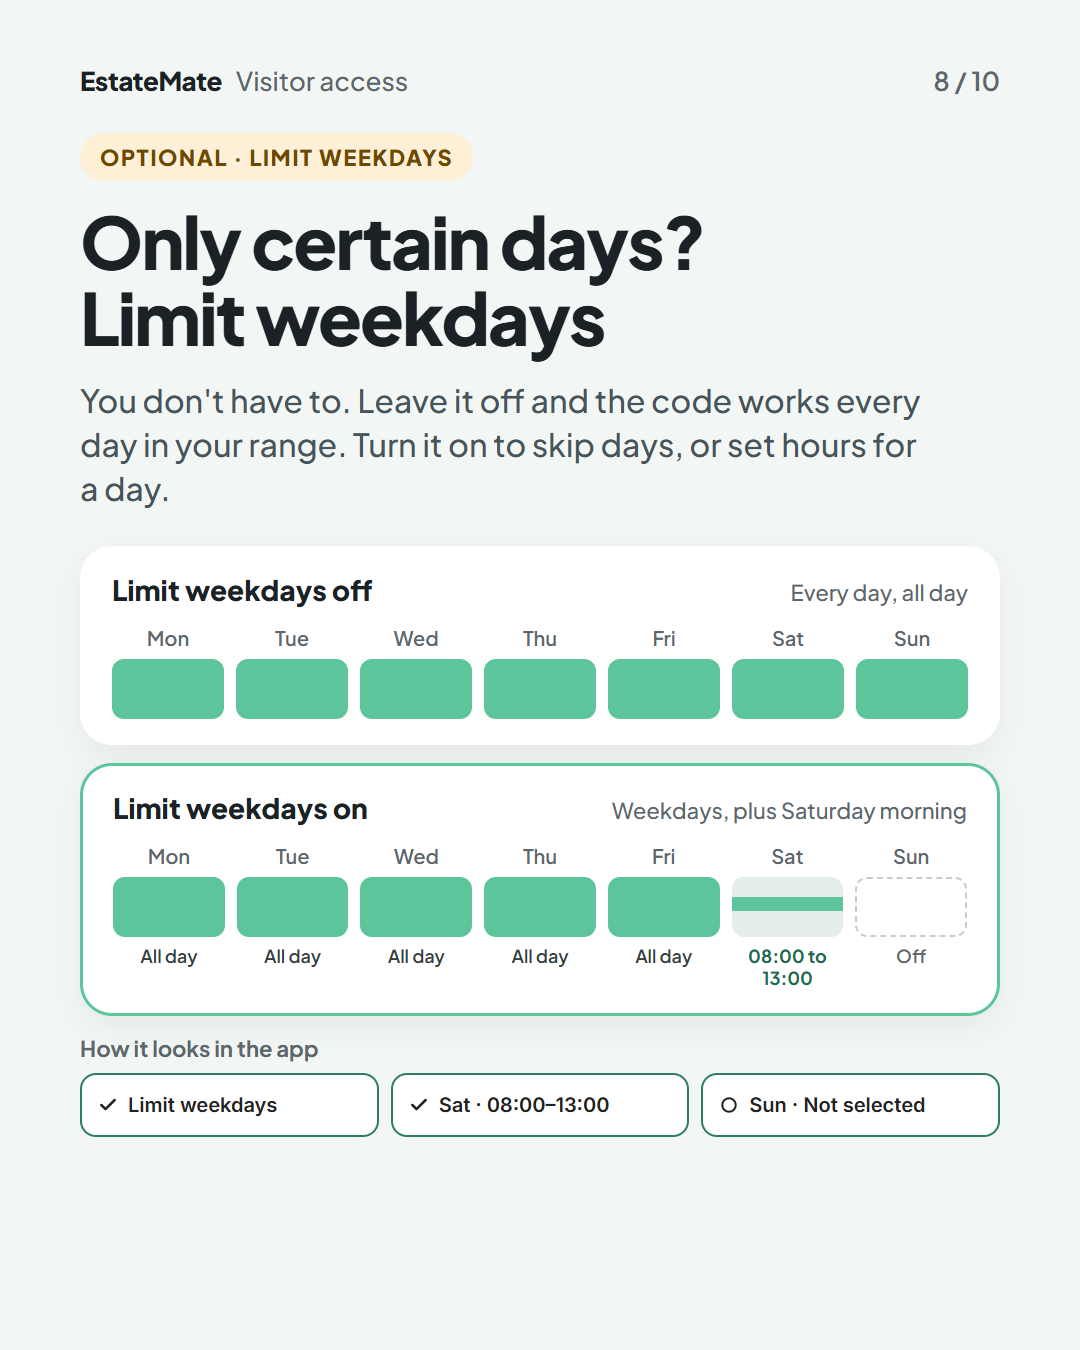
    Two week strips, Monday to Sunday. With Limit weekdays off, all seven days are filled: every day, all day. With Limit weekdays on, Monday to Friday are filled as "All day", Saturday shows a short bar for 08:00 to 13:00 and Sunday is a dashed empty box marked "Off". A row underneath, "How it looks in the app", shows three small controls: Limit weekdays ticked, "Sat · 08:00–13:00" ticked and "Sun · Not selected".
  9. Your code: share it, or revoke it if plans change

    Send the QR code and access code by WhatsApp or Share. You'll find all your codes under Visits. If plans change, tap Revoke access.
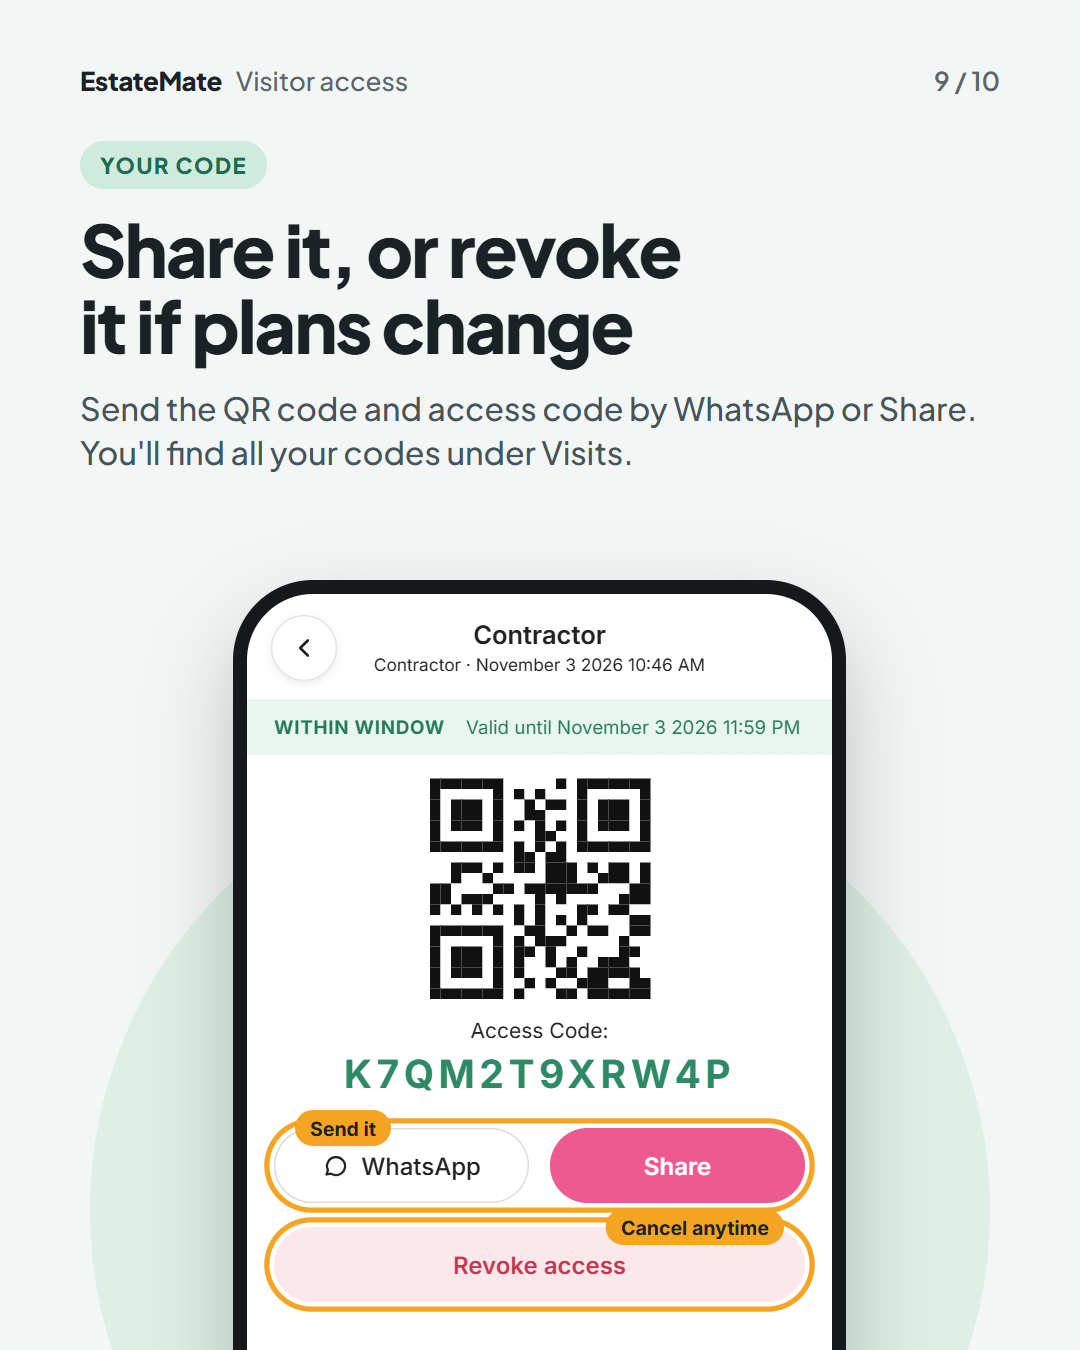
    A code screen for a Contractor visit with a green "Within window" bar and a valid-until time, a sample QR code and a sample access code. The WhatsApp and Share buttons are circled and labelled "Send it". The Revoke access button below is circled and labelled "Cancel anytime".
  10. We're listening

    We don't always get it right first time. Building something flexible enough for hundreds of communities, each with its own way of doing things, is always a good challenge. Your feedback is how we make it better. If something feels harder than it should, please let us know at support@estatemate.co.za.
    Closing card on a dark background: "Tell us how it's working for you", with the support email address and the sign-off "The EstateMate team".

The visitor types you see are set by your community, so your list may look different from the examples in this guide.

Still stuck?

Send us a request. We’ll know you were reading this guide, so you won’t have to explain where you are.

Submit a request